Altitude Angel Identity Provider
Altitude Angel authentication services support standard OAuth v2 user logins via the Authorization Code Grant flow of OAuth v2.
Getting started
This feature requires activation on your Client CredentialsBefore Altitude Angel will permit your application to login on a user's behalf, you must register your endpoint URIs via the Developer Portal. For more information on how to do this, please contact us.
Please note that we do not currently support the Implicit Grant flow for client-side JS and the Authorization Code Grant flow should be used instead.
Overview
This flow works by redirecting the user to our Authorize endpoint with a well-known URI, and then waiting for a redirect to your callback URI. Upon successful login, the callback URI will be called and will contain a code which can then be submitted to our Token endpoint to obtain the user's access token.
The access token is then submitted on each request made to our API services to authenticate them as the user.
The base URI for all Altitude Angel authorise calls is: https://auth.altitudeangel.com.
High-Level process outline
The method for handling the Authorization Code Grant flow is slightly different depending on whether the callback is implemented solely in client side JavaScript, or via server-side code. In this guide, we'll approach client-side, since it's the most requested by our users.
The flow can be broken down into three stages:
- Logging-in the user
- Receiving the callback
- Acquiring the access token
Logging In The User
To log in the user you must build a URI that conforms to the OAuth v2 specification. This URI will contain several query string parameters detailed below.
GET /oauth/v2/authorize?[parameters]Parameters
| Name | Description |
|---|---|
| client_id | The client ID of the requesting application |
| response_type | The type of response required by the client. Must be code |
| scope | Space (%20) separated list of scopes that the client needs for user approval |
| redirect_uri | The callback URI that the user will be redirected to upon completion of the logon and approval process. Should not be URL encoded. |
| state | (optional) State field that will be included in the callback to track requests to callbacks and prevent unsolicited callbacks |
Notes
- Not all scopes require user approval but the user will always have to approve access by the client application even if no scopes require approval.
- The redirect URI must exactly match one of the redirect URIs configured for your account, and should not be URL encoded
- The auth.altitudeangel.com request and the redirect URI must use SSL
- The OAuth v2 spec lists redirect URI as optional, Altitude Angel requires this parameter for security
- All parameter values should be URI encoded
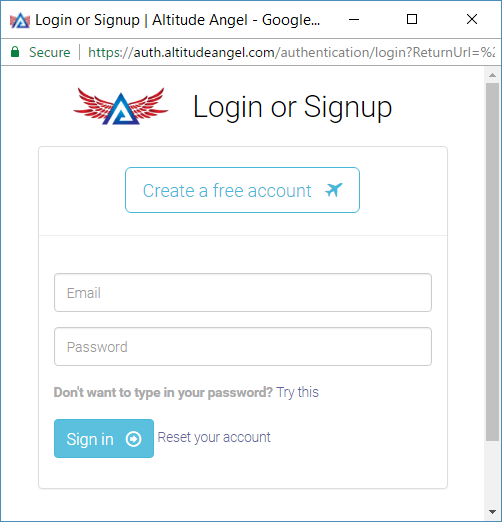
If you have constructed a valid URI and your Client Credentials have been updated to permit this method of authenticating users, you will see a web page similar to the following:

The Altitude Angel Identity Provider login screen using the Default theme.
You'll note that we'll automatically handle the creation of a user account if your end-user doesn't yet have an Altitude Angel account.
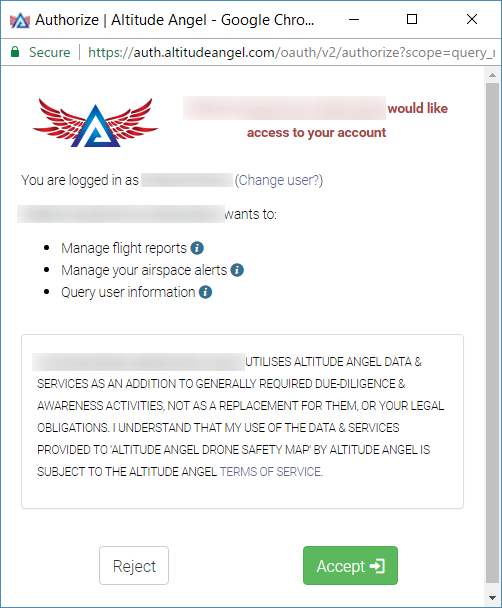
When the user logs in, if required, Altitude Angel will ask the end-user whether they wish to permit your client application to access the data you have requested:

The end-user must permit your Client application access to the data or features you have requested.
Example in JavaScript
For a server-side handled redirect URI it is suggested that the authorise page is a redirect of the current page.
For a pure JS-based single page application (SPA), it is suggested to open the authorise page
in a popup window (you can see this in action on https://www.dronesafetymap.com). It is suggested to size the window appropriately (500x600px) and to centre it within the parent, to ensure it captures your user's attention.
The below example is using URI.js to build the URI but string concatenation would also work:
let state = "some random state value here";
let uri = URI("https://auth.altitudeangel.com/oauth/v2/authorize")
                .addQuery({
                    scope: authDetails.scope,
                    client_id: authDetails.clientId,
                    redirect_uri: authDetails.redirectUri,
                    response_type: "code",
                    state: state
                });

let newWidth = 500;
let newHeight = 600;
let newX = window.screenX + (innerWidth / 2) - 250;
let newY = window.screenY + (innerHeight / 2) - 300;

let loginWindow = window.open(uri.toString(), "_blank",
                              `toolbar=no,scrollbars=no,resizable=yes,width=${newWidth},height=${newHeight},left=${newX},top=${newY}`);
Receiving the callback
The callback to the redirect URI can be received by a JS SPA or via a server. For a server the server side code should acquire the code from the URI and request the access token with it.
JavaScript SPAs
Assuming that the authorize page was opened in a popup as described above, the popup window should be monitored for the location being set to the redirect URI.
It is suggested that a poll using setInterval with a 100-200ms interval can be used to check the location field. Please note that checking the location field of the popup window may throw an exception when it's not on the same domain as the hosting page. This will occur when the browser
is on the altitudeangel.com domain delivering auth pages, so the check should be wrapped in a try/catch block to handle this.
Once the location starting with the redirect URI is detected, the location query string should be parsed for a code parameter.
You will need to present this code in order to obtain an access token.
Acquiring The Access Token
Once the code is obtained from the callback it can be submitted to the token endpoint to acquire an access token that can be used by the application to make requests authenticated as the user with the scopes that they approved.
To acquire this access token a request is made to the token endpoint with the code. See the OAuth v2 RFC.
POST /oauth/v2/token
HOST: auth.altitudeangel.com
Content-Type: application/x-www-form-urlencoded

grant_type=authorization_code&code=xxxxx&redirect_uri=https://xxxxxxxx&client_id=xxxxxx&client_secret=xxxxxx&state=xxxxxx
The access and refresh tokens should ideally be stored on the client to prevent the user having to authenticate repeatedly. How to store these is beyond the scope of this tutorial, but a client-side cookie, local storage etc could be used.
However, be aware that any code running on the client could potentially access these.
Parameters
| Name | Description |
|---|---|
| client_id | The client ID of the requesting application |
| client_secret | The client secret of the requesting application |
| grant_type | The type of grant the client is requesting. Must be authorization_code |
| redirect_uri | The callback URI that the was used to obtain the code, this must match, and not be URL encoded |
| state | (optional) State field that will be included in the response |
The response will contain the access token and a refresh token:
{
       "access_token": "example token",
       "token_type": "bearer",
       "expires_in": 3600,
       "refresh_token": "example token",
       "state": "your state value"
     }
This token can then be passed as an authorization header in all subsequent requests.
GET /someapicall
Authorization: Bearer access_token_goes_here
Token Expiration
The access token will eventually expire (we typically use a 15-minute expiration on our access tokens). After this, the token must be refreshed.
Refreshing an Access Token
Access Tokens Expire after 15 minutesIn order to ensure the access tokens are current and users can revoke them in a timely manner, we typically mark them for expiration after 15 minutes. After this time, the access token will be invalid and must be refreshed.
This can be handled transparently from the user via the refresh token that was issued along with the access token. The refresh token is typically valid for a much longer period than the access token, usually weeks or months. However if the user has changed their password, or revoked their permissions for the application, then the issued refresh tokens may cease to work and the user will need to login again.
To use a refresh token, a call is made the to Altitude Angel token endpoint and a new access token / refresh token pair will be returned.
This should be handled transparently from the user.
Using a refresh token
To acquire this access token a request is made to the Token endpoint with the code. See the OAuth v2 RFC.
POST /oauth/v2/token
HOST: auth.altitudeangel.com
Content-Type: application/x-www-form-urlencoded

grant_type=refresh_token&refresh_token=xxxxxxx&client_id=xxxxxx&client_secret=xxxxxx&state=xxxxxx
The access and refresh tokens should ideally be stored on the client to prevent the user having to authenticate repeatedly. How to store these is beyond the scope of this document but a client side cookie, local storage etc could be used. Be aware that any code running on the client
could potentially access these.
Parameters
| Name | Description |
|---|---|
| client_id | The client ID of the requesting application |
| client_secret | The client secret of the requesting application |
| grant_type | The type of grant the client is requesting. Must be refresh_token |
| refresh_token | The refresh token to be used |
| state | (optional) State field that will be included in the response |
The response will contain a new access token and refresh token.
If the response status is a 401 Access Denied, then the refresh token is no longer valid and the user must logon again.
{
       "access_token": "example token",
       "token_type": "bearer",
       "expires_in": 3600,
       "refresh_token": "example token",
       "state": "your state value"
     }
This token can then be passed as an authorization header in all subsequent requests:
GET /someapicall
Authorization: Bearer [access_token_goes_here]
Transparently Handling Refresh
For every request made to the Altitude Angel APIs with a bearer access token, you must check the response code for an 401 Access Denied error.
When this is received and using a previously valid access token, you should make a request for a new access token using the refresh token as described above.
Once a new access token is received then retry the failed request using the new access token. If this also results in the same response code then an error should be returned to the user.
There are many ways to handle this process automatically, for example wrapping all jQuery calls to $.ajax() to automatically process the response, acquire a new token and retry. This wrapper can also add the Authorization HTTP header.
It is suggested that the calls also handle initiating the user logon flow in the case where the access token is not present or the refresh token fails for a seamless experience.
It is suggested that the $.ajax() not be replaced by the wrapper to prevent other libraries and code that may use jQuery from accessing the Altitude Angel APIs using the access token.
Calling the APIs then becomes a simple exercise of using the wrapper function which will handle user logon, authorization and refresh for you.
Updated 8 months ago
